You pour hours into writing a blog post. You hit publish. Crickets. No shares, no traffic, no leads. Sound familiar?
It’s not your writing, it’s your structure. Without a clear blog post outline, even the best ideas fall flat. Companies that blog consistently generate 67% more leads than those that don’t. A great outline is where that success starts.
Even the best ideas get lost in a messy draft without a clear blog post outline. Your post ends up unfocused, your readers lose interest, and your traffic flatlines.
Whether writing yourself or managing a team, starting with a structured outline is the key to creating high-quality content.
In this blog post, I’m sharing the key things you need to do before creating a blog post outline, and how to create one to help you produce a logical piece of content.
Table of Contents
ToggleWhat is a blog post outline and why does it matter?
A blog post outline is a simple framework that helps you organize your thoughts before writing, ensuring clarity and coherence. It streamlines your workflow, prevents writer’s block, and ensures your content is clear, engaging, and SEO-friendly.
Imagine writing a blog post without an outline. It’s like assembling IKEA furniture without instructions. You end up with missing pieces, a lopsided shelf, and the sinking feeling that you skipped a step, but which one?
A blog outline is your step-by-step guide, ensuring every section clicks into place seamlessly.
Without one, your post rambles, lacks structure, and overwhelms readers.
A solid outline prevents this. It’s the foundation of every well-structured, high-performing post, helping your ideas flow logically, keeping readers engaged, and making SEO optimization effortless.
Here’s what a blog post outline will help you do:
- Organize your ideas clearly. Before anything else, an outline structures your content and prevents rambling.
- Ensure a logical flow. Your main points will connect naturally, avoid repetition, and fill content gaps.
- Keep your content focused. A structured outline stops idea-hopping and keeps you on track.
- Match what your audience is searching for. Align your content with search intent to increase relevance and engagement.
- Optimize for SEO from the start. A clear structure helps Google index your post and improves ranking potential.
- Make your post easier to read and engage with. A well-structured, SEO-friendly format keeps readers on the page longer.
- Speed up your writing process. Breaking topics into sections eliminates writer’s block and makes drafting faster.
- Scale your content production effortlessly. Using a repeatable outline format ensures consistency and helps you create high-quality content faster.
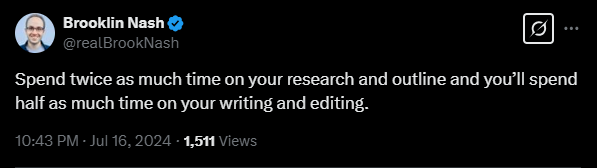
Brooklin Nash of Beam Content puts it best:
Before you even start outlining, you need a game plan. A well-structured outline isn’t just about headings, it’s about purpose. Here’s what you need to lock in first.
Key things to know before creating a blog post outline
Before creating your blog post outline, you should have answers to a few key things that will drive your creation process, such as:
What’s the purpose of your blog post?
TL;DR:
- A how-to guide is an instructional, step-by-step guide.
- A comparison post focuses on the pros, cons, and recommendations.
- Define this before writing to shape tone, structure, and CTA.
Before you start writing, ask yourself: What’s the goal of this post? Am I guiding readers through a process or helping them choose between options?
A How-to guide is typically step-by-step and instructional, while a comparison post focuses on pros, cons, and recommendations.
Defining this up front will shape your tone, structure, and CTA.
Get this wrong, and your content won’t drive the results you want.
Who’s your audience?
TL;DR:
- Beginners? Keep it jargon-free and explain concepts clearly.
- Experts? Skip the basics and focus on advanced insights.
- Speak their language, or they’ll bounce.
Are you writing for new bloggers who need a beginner-friendly approach or seasoned marketers looking for advanced SEO tips? Understanding their knowledge level helps tailor your language, examples, and depth of research.
Example:
- Explaining SEO to a small business owner? Skip the jargon. Walk them through Google rankings in plain English.
- Writing for pro marketers? Show them advanced backlinking strategies, not “What is SEO?”
If you don’t tailor your language and depth to the right audience, your post either confuses beginners or bores experts. Speak their language, or they’ll bounce.
What keywords should you target?
TL;DR:
- Broad keywords drown in competition. Ultra-niche keywords get no traffic. Find the sweet spot.
- Use keyword tools, but don’t rely on them blindly. Align with real search intent.
- Your goal isn’t just ranking. It’s attracting the right audience.
Choosing “email marketing best practices” (broad) vs. “how to increase email open rates” (specific) shifts your post’s focus, audience, and depth. Picking the right keywords ensures your post actually gets found.
Use keyword tools like Ahrefs, SemRush, or Ubersuggest to find relevant terms, but don’t rely on them blindly. Check search intent. Are people looking for a guide, a list, or a product? Align your content accordingly.
Why would someone search for this?
TL;DR:
- Match intent or miss the mark. If people want comparisons, don’t give them a tutorial. If they want a tutorial, don’t give them theory.
- When in doubt, Google it. The top results tell you exactly what searchers expect.
Every search has intent. If you don’t match it, your content won’t rank, or worse, it’ll attract the wrong audience.
If someone searches “best project management tools,” they likely want comparisons. If they search “how to organize tasks in ClickUp,” they need a tutorial.
Miss this, and readers will bounce. Align your content with what they actually want.
How do competitors approach the topic (and how to do it better)?
TL;DR:
- Analyze top-ranking content for depth, examples, and formatting.
- Identify gaps and add value (more insights, better clarity, stronger visuals).
- Don’t just repeat. Improve. That’s how you rank.
Before you write, see what’s already ranking. What are competitors doing well? Where are they falling short?
- Are they covering the topic in depth, or just scratching the surface?
- Do they provide real examples or just generic advice?
- Are they missing visuals, case studies, or expert insights?
Now, ask yourself: “How can I make this better?”
For example:
- If every blog covers “How to Use ChatGPT for Blogging,” take it further with “Advanced ChatGPT Prompts for Blog Writing.”
- If they give basic explanations, add case studies, expert quotes, or unique insights.
- If their content is text-heavy, improve it with infographics, videos, or interactive elements.
Google won’t rank content that blends in. Find the gaps. Fill them better than anyone else.
What’s the right blog post format?
TL;DR:
- Listicles work best for “top tools,” “best strategies,” or quick takeaways.
- Long-form guides are ideal for deep dives and in-depth explanations.
- Format isn’t just design. It shapes engagement and retention.
Your blog post format isn’t just about aesthetics—it determines how well your content engages readers.
- Need a quick, scannable read? A listicle (e.g., “7 AI Tools for SEO Content Creation”) works best.
- Covering a complex topic? A long-form guide (e.g., “The Complete SEO Writing Playbook for 2025”) provides depth and authority.
Readers expect different formats based on their search intent. Get it wrong, and they’ll bounce. Choose the format that makes your content easy to consume.
Before writing, get clear on purpose, audience, keywords, and format. This will make your content more effective and easier to write.
- Know why you’re writing the post.
- Understand who you’re writing for.
- Pick keywords that match search intent.
- Choose the right format for your topic.
Get these right, and your blog post will be structured for success from the start.
How to create your blog post outline in 8 steps
Now that you’ve set a strong foundation, let’s break down the exact steps to create a powerful blog post outline.
I’ll use “Healthy Meal Prep for Beginners” as an example throughout each step, so by the end, you’ll see a complete, structured outline in action.
1. Brainstorm ideas
Start by writing down all the things you want your readers to know by the end of your blog post. You’ll worry about organization later. For now, just let all of your ideas flow naturally.
Try the “mind mapping” method to generate ideas efficiently:
- Write your main topic in the center of a page (e.g., “Healthy Meal Prep for Beginners.”).
- Draw branches for key sections (e.g., “Meal Planning Mistakes,” “How to Save Money on Groceries,” “Batch Cooking Tips.”).
- Under each section, list subtopics (under “Meal Planning Mistakes” → “Not Prepping Enough Protein,” “Overcomplicating Recipes.”).
- Look for content gaps. Are there missing elements that could enhance your post?
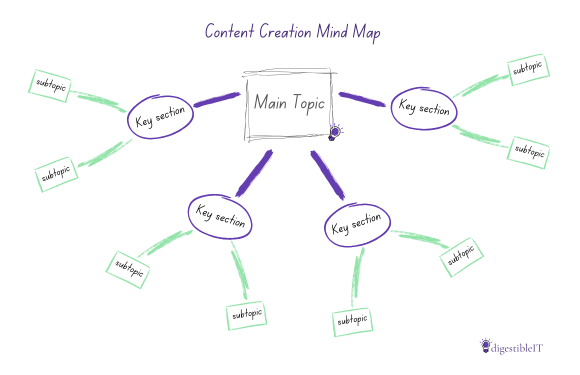
Picture this: You’re staring at a blank page, unsure where to start. Instead of forcing an intro, sketch a quick mind map for your topic “Healthy Meal Prep for Beginners.”
Branch out into “Common Meal Planning Mistakes,” “Money-Saving Grocery Tips,” and “Batch Cooking Shortcuts.” Now, your outline practically writes itself.
By laying out your ideas visually, you can easily spot gaps, refine your focus, and ensure no key points are overlooked.
This method ensures you cover all critical aspects before structuring your outline.
It will later help you decide which headings and subheadings will stay and which ones to ditch.
If you’re a subject matter expert, include your opinions and ideas wherever suitable. If the subject is new to you, research authoritative sources or Google’s People Also Ask to understand common pain points.
Write down all the ideas and key points you came across. Analyze how your competitors approach the topic, and how and where you can improve yours with unique angles (because you don’t want to just copy what’s already out there).
2. Organize ideas into headings and subheadings
Now that you’ve brainstormed your ideas, start to shape your blog post outline by organizing them into headings and subheadings.
Highlight the main sections as H2 to create a smooth flow of your ideas, and subheadings as H3 to clarify the main idea.
Headings break your content into sections and highlight a specific aspect of your topic, helping both readers and search engines better understand your content.
Let’s look at our example of “Healthy Meal Prep for Beginners.”
A poor outline might look like this:
- H2: Healthy Eating
- H2: Meal Planning
- H2: Cooking Tips
A better outline with logical progression and H3 subheadings would be:
- H2: Step 1: Understanding the Basics of Healthy Eating
- H3: The Key Principles of a Balanced Diet
- H3: Common Mistakes Beginners Make
- H2: Step 2: How to Plan Your Meals for the Week
- H3: Creating a Grocery List Based on Your Meal Plan
- H3: How to Batch Cook Without Wasting Food
- H2: Step 3: Smart Grocery Shopping for Meal Prepping
- H3: How to Save Money on Ingredients
- H3: What to Buy in Bulk (and What to Avoid)
- H2: Step 4: Cooking and Storing Your Meals Properly
- H3: The Best Containers for Meal Prepping
- H3: How Long Different Foods Last in the Fridge and Freezer
Notice how the first outline is too broad and lacks structure? And how the second outline adds more structure and guides the reader through a step-by-step process?
The second outline follows a step-by-step approach and uses H3 subheadings to break down complex ideas, making it easier for readers to follow.
After you write all of the headings and subheadings, write a few sentences explaining the key takeaway of each, and include bullet points emphasizing key ideas, examples, quotes, etc.
- H2: Step 2: How to Plan Your Meals for the Week
- Key takeaway: Planning your meals saves time, reduces food waste, and helps you stick to a healthy eating routine. A structured meal plan prevents last-minute unhealthy choices.
- Key ideas:
- Avoid decision fatigue.
- Balance nutrition.
- Save money.
- H3: Creating a Grocery List Based on Your Meal Plan
- Key takeaway: A well-organized grocery list helps you buy exactly what you need, avoiding waste and unnecessary spending.
- Key ideas:
- Organize by category.
- Check what you already have.
- Stick to the list.
This approach makes your outline more actionable and detailed, helping both you and your readers follow a clear structure when writing or consuming the content.
3. Optimize your blog post outline for SEO
A well-structured outline boosts your blog’s search rankings and readability. Here’s how to integrate SEO from the start:
1. Research keywords and search intent
Use tools like Ahrefs, Ubersuggest, or Google’s “People Also Ask” to find relevant keywords.
Identify:
- Primary Keyword: The main topic (e.g., healthy meal prep for beginners.)
- Secondary Keywords: Related terms (e.g., easy meal prep ideas, budget-friendly meal prep, etc.).
Check the top-ranking pages. Are they step-by-step guides, lists, or deep dives? Match their format to align with user expectations.
2. Use keywords in headings and subheadings
Google prioritizes clear, structured content.
Keep headings concise and keyword-rich:
- Instead of “Meal Prep Tips” → Try “5 Easy Meal Prep Tips for Beginners to Save Time & Money”
Organize subheadings logically:
- H2: Step 2: How to Plan Your Meals for the Week
- H3: Creating a Grocery List Based on Your Meal Plan
- H3: How to Batch Cook Without Wasting Food
This makes your content scannable for readers and optimized for search engines.
3. Optimize for readability
Google ranks content higher when it’s easy to read and navigate. Here’s how to optimize your outline for readability:
- Use short paragraphs and bullet points to keep readers engaged and improve scannability.
- Write clear, structured answers to increase chances of ranking in featured snippets.
- Include keywords naturally to improve relevance and without keyword stuffing.
- Optimize images and alt text to boost accessibility and SEO.
- Add internal links strategically to strengthen site structure and guide readers to related content.
A clear, skimmable outline makes your content easier to read for both users and search engines.
4. Plan internal and external links
- Internal links: Guide readers to relevant content on your website (e.g., “Best High-Protein Foods for Meal Prep”).
- External links: Cite credible sources like a study on the benefits of meal prepping or a nutritionist’s guide to balanced meals.
An SEO-optimized outline isn’t just about ranking, it makes your content more readable, valuable, and engaging. The better your structure, the longer people stay.
4. Include relevant data and statistics
The next step is to add relevant data and statistics to support your main points.
After brainstorming ideas and researching your topic, you’ll already know what statistics, data, or expert opinions you’ll want to include in your content.
Now, organize them under the right headings and subheadings to save time when you start writing.
Use the most recent data available, ideally within the last two years. If citing older statistics, ensure they’re still relevant today.
Use Google Scholar, Statista, and industry reports to find up-to-date data. Place statistics in your introduction and key points to boost credibility.
Using relevant data and your own experience will improve your website’s E-E-A-T and help your content stand out in the SERPs.
For example, instead of saying: “Meal prepping saves time.”
Back it up with data: “Studies show meal prepping can save up to 8 hours per week compared to daily cooking.”
Adding concrete numbers makes your content credible and memorable, increasing reader trust.
Also, this is the step where you decide where to include visuals like infographics, screenshots, charts, or any other media that will enhance your content and improve readability.
5. Conclude with a strong CTA
In the conclusion, summarize your key ideas, add relevant links, and guide readers toward the next step.
For example, for our “Healthy Meal Prep for Beginners” guide, instead of writing a weak CTA like:
- “Now you know how to meal prep. Start today!”
Use a clear, action-driven CTA:
- “Ready to simplify mealtime and eat healthier? Grab our free 7-day meal prep guide and start prepping smarter, not harder.”
This CTA gives the reader a specific next step, reducing hesitation and keeping them engaged with your content.
6. Outline the intro
I don’t know about you, but I usually like to write the intro last. This way, I have a deeper understanding of the topic and the main pain points my readers face, allowing me to make it stronger and more focused.
You can outline your blog post intro in a few bullet points by identifying the main problem your readers have and showing how your blog post will help them solve it.
For example, if you want to highlight how meal prepping saves time and reduces stress, don’t just start with:
“Meal prepping is a great way to save time in the kitchen.”
Instead, hook the reader with a relatable scenario:
“You come home after a long day, starving. You open the fridge… nothing’s ready. Now you either spend 50 minutes cooking or order takeout again. Sound familiar? What if you could have healthy, homemade meals ready in minutes? That’s the power of meal prepping. Here’s how to get started…”
A real-life scenario makes the introduction more engaging by drawing readers in and helping them emotionally connect with the problem.
7. Write a working title
Now that you have a solid blog post structure and know what it will cover, it’s time to create the title.
Your title should include your focus keyword, be eye-catching, and highlight the purpose of your blog post.
Let’s take a look at our example.
Weak Title: “How to Meal Prep”
Strong Title: “7 Time-Saving Meal Prep Tips for Beginners”
The first title is too generic. It doesn’t specify who it’s for or why it matters.
The second title is better because it:
- Uses a number (“7 Easy Meal Prep Tips”) to signal a structured, easy-to-follow list.
- Highlights a key benefit (“Time-Saving”) to attract busy beginners who want efficiency.
- Clarifies the audience (“for Beginners”) so readers know it’s tailored to their skill level.
The goal is to write a working title now, but you can always come back and adjust it later (as you probably will).
A strong blog post title grabs attention, sparks curiosity, and encourages clicks.
Here are five key elements that make a title stand out:
- Power words, to command attention
- Emotions, to create a connection
- Numbers, to add structure and clarity
- Questions, to spark curiosity
- Descriptive adjectives,, to strengthen the impact
With your working title in place, you now have a clear direction for your blog post. But before you start writing, you have one more step to complete.
8. Review and revise your outline
The purpose of your blog post outline is to help you see if the structure will be good as a complete article before writing it.
Before finalizing your outline, do a quick self-check:
- Read your subheadings in order. Do they tell a logical story? Does your outline flow smoothly from understanding healthy eating to meal planning, grocery shopping, batch cooking, and proper storage?
- Check for missing sections. If your post is about “Healthy Meal Prep for Beginners” but you didn’t include “How to Properly Store Prepped Meals,” you might need to add it.
- Eliminate fluff. If you have a section titled “What is Meal Prepping?” but your audience is already familiar with the concept, remove it or reframe it as “Meal Prepping Myths That Could Be Holding You Back.”
This step ensures your outline stays focused, valuable, and structured, so you don’t waste time later.
If you work with an editor (or fellow writer), ask them to go through your blog post outline to see if the structure flows logically and if each section contributes to the blog post’s purpose.
Getting constructive feedback before you start writing will save you a lot of time and frustration later.
Once you’ve refined your outline and ensured it flows logically, you’re ready to put it all together.
Here’s what our final blog post outline would look like:
Full blog post outline example
H1: Healthy Meal Prep for Beginners – A Step-by-Step Guide
Intro
- Struggle with cooking every day? Meal prepping saves time, money, and stress.
- Include statistics on how meal prepping saves time/money (e.g., “Meal prepping can cut food costs by 25%”)
- This guide will walk you through the essentials from planning meals to smart grocery shopping and food storage.
- Embed infographic: “Meal Prep Benefits at a Glance”
H2: Step 1: Understanding the Basics of Healthy Eating
- H3: The Key Principles of a Balanced Diet – Focus on proteins, carbs, and healthy fats.
- Link to external source: USDA MyPlate guidelines or a nutrition study
- H3: Common Mistakes Beginners Make – Overcomplicating meals, lack of variety.
- Include an expert quote or stat on common meal prep mistakes
H2: Step 2: How to Plan Your Meals for the Week
- H3: Creating a Grocery List – Organize by category, check what you have
- Embed infographic: “How to Build a Balanced Grocery List”
- Internal link: Related article on grocery shopping tips
- H3: How to Batch Cook Without Wasting Food – Cook in bulk, freeze leftovers properly.
- Include a tip on how long different foods last in the fridge vs. freezer
H2: Step 3: Smart Grocery Shopping for Meal Prepping
- H3: How to Save Money on Ingredients – Buy seasonal produce, use discounts.
- Include a stat on how meal prepping reduces food waste
- H3: What to Buy in Bulk (and What to Avoid) – Stock up on pantry staples, avoid perishable bulk buys.
- Embed table: “Best Foods to Buy in Bulk”
H2: Step 4: Cooking and Storing Your Meals Properly
- H3: Best Containers for Meal Prepping – Glass vs. plastic, leak-proof options
- Internal link: “Best Food Storage Containers for Meal Preppers”
- H3: How Long Different Foods Last – Storage times for fridge and freezer
- Include data table: “Food Storage Timelines”
- Embed short video: “How to Store Prepped Meals for Maximum Freshness”
H2: Conclusion & CTA
- Meal prepping helps you eat healthier, save time, and reduce food waste.
- Start small, prep a few meals this week and build from there.
- CTA: Download our 7-day meal prep planner to get started!
Avoid these common mistakes when creating a blog post outline
Even the best content can fall flat if your outline isn’t set up for success. Avoid these common mistakes to keep your blog post focused, engaging, and easy to write:
- Ignoring your audience’s search intent – If your content doesn’t answer the right questions, readers (and Google) will move on.
- Choosing the wrong blog post format – A step-by-step guide works for tutorials, while a listicle is better for tool recommendations. Pick the format that best delivers your message.
- Creating a complex structure that confuses readers – A messy, disorganized outline leads to a confusing, unreadable post. Keep it clear and logical.
- Excluding essential points relevant to your topic – Missing key sections weakens your content’s value. Make sure your outline fully covers the topic.
- Stuffing your blog post with irrelevant sections and details – Extra fluff dilutes your message and bores readers. Stay concise and on-topic.
- Rejecting constructive feedback – A second pair of eyes can catch weak points and improve flow. Don’t skip this step!
A well-structured outline is the foundation of a great blog post. Avoid these mistakes, and you’ll create content that’s clear, engaging, and optimized for success.
Free tools and templates to help you create blog post outlines
If you don’t want to create outlines manually, several tools and templates can help you in the creation process.
Free tools to create blog post outlines:
- Ahrefs – Free AI Outline Generator
- SurferSEO – Free AI Article Outline Generator
- Writesonic – Free AI Outline Generator
- Copy.ai – Free Outline Generator
If you feel like writing a good prompt that you can use every time you need to create an outline, you can also use ChatGPT to help.
Free templates to structure your outlines:
- Hubspot – 30 Free Blog Post Templates
- Ahrefs – 6 free blog post templates
- WordStream – 9 Free Blog Post Templates
Try out these tools and templates to streamline your outline creation, save time, and improve content quality.
FAQs
1. How long should a blog post outline be?
A blog post outline should be as detailed as necessary but as concise as possible to keep your writing focused and efficient.
Here’s a general guideline based on post length:
- Short posts (500–1,000 words): A simple outline with 3–5 key points, including an introduction, main sections, and a conclusion.
- Medium posts (1,000–2,000 words): A more structured outline with sub-points under each section, possibly including bullet points for examples or supporting details.
- Long-form posts (2,000+ words): A detailed outline with headings, subheadings, and notes on statistics, examples, or links to reference materials.
2. Do I need to create an outline for every blog post?
Not always, but it’s highly recommended. If you’re writing a quick, casual post, you might get away without one. But for anything longer or more strategic, an outline keeps your ideas organized, improves readability, and helps with SEO.
Think of it as a roadmap. Skipping it might work sometimes, but having one ensures a smoother, more effective writing process.
3. How can I make my outlines more effective?
Start by brainstorming ideas and organizing them into clear headings and subheadings to create a logical flow. Optimize your outline for SEO by incorporating relevant keywords, and strengthen your points with data and statistics.
Outline your introduction to set the stage for your post, write a working title to stay focused, and end with a strong CTA. Finally, review and revise your outline to ensure clarity and coherence. This extra step makes writing smoother and more impactful.
Let’s digest it
A solid blog post outline sets your content up for success. Structured posts get more engagement, better retention, and higher rankings.
Before writing, outline your key points, organize them logically, and ensure they align with your audience’s needs. Doing this will save you time and make your content clearer, more compelling, and easier to rank
Your blog’s success starts before you type a single word. Nail the outline, and the writing will take care of itself.
Ready? Open a new doc and start structuring your next viral post.
Ready to level up your blog game? Dive into this step-by-step guide on formatting for maximum traffic and engagement.
Ema is a writer, editor, and content strategist with 10+ years of experience. She helps brands turn vague traffic goals into content that connects, not just ranks.